
")
")
")
")
")
")
the nautical sextant in celestial navigation
How to use a nautical sextant - video tutorial realized by Capt. Roberto Iori
How a marine sextant works: a video-tutorial to show you how to quickly take a sight with a sextant, to take the first steps into the fascinating world of celestial navigation.The completion of a project (using a parametric 3D computer-aided design modeler FreeCAD 0.18 ) allowed to reach two goals: the costruction of a sextant model and the creation of a short video: introduction to the use of the sextant by a small and simple animation to share with celestial navigation enthusiast.
Instrument error in a sextant: prismatic error, graduation errors, eccentricity of sextant
A good sextant is accompanied by a calibration certificate which reports the “ reading errors “ along its full graduated scale; otherwise the factory declares that the instrument is free of errors (certifying that the error is less than +/- 9” which is negligible for practical use). Cassens & Plath attests that ! (tools of excellent quality so they aren't affected by this type of error). In plastic sextants (didactic/teaching aid) this error is never declared.
Adjustable errors
the sequence has to be respected in detecting and removing of errors :
1 - Perpendicularity Error
2 – Side Error
3 – Collimation Error
4 – Index Error
Perpendicularity Error
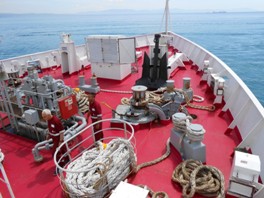
This error appears when the index mirror (rectangular mirror) is not perpendicular to the frame (and arc). It is easy to detect it. Put the sextant on an horizontal plane and move the alidade to a position 35°-45° degrees. Look at the index mirror in the direction of arc (graduated scale). We see two images of the scale: the reflected image on the left side, the direct image on the right side. We must see a straight line (the arc with the graduated scale) as in this photo:

If we see a broken line we remove the error using the adjusting screw on the index mirror:

Side Error
This error appears when the horizon mirror (rounded mirror) is not perpendicular to the frame.
We choose a very small star in the sky (less than magnitude 4.0 or 5.0) to identify the error. Set the alidade to zero degrees, observe the star with the sextant and move the drum (minute scale).
The reflected star has to pass alternately below and above the direct star (not reflected) :

Here the reflected star does not pass on the direct star in the vertical movement:

the “ side error ” must be removed using the adjusting screw on the horizon mirror (screw no. 1):

adjustment screws on the horizon mirror
Collimation Error
“ a high quality sextant is not affected by this error “
Index error
We can use the sea horizon, a small star, the Sun or an horizontal line at a distance of 3 nautical miles at least (to avoid the parallax error).
The sextant has an index error if index mirror and horizon mirror are not parallel when the index arm (alidade) and the drum with minute scale are set exactly at zero. If the error is more than +/-3,0’ we have to reduce it.
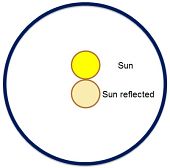
We look at the horizon with the telescope: direct horizon and the reflected horizon should be a straight line.
 index error

no index error
We move the drum until we see a straight line: the reading is the index error.
We can use the Sun to detect this error with two, four, six measurements:
measurement no. 1

measurement no. 2
example :
measurement no. 1 reading : +18,5’
measurement no. 2 reading : - 13,5’
index error = (algebraic sum of the measurements) / 2
index error + 2,5’.….correction for index error : -2,5’ (the opposite of +2,5’)
the “index error” must be removed or reduced using the adjusting screw on the horizon mirror (adjustig screw no. 2).
If we turn the adjusting screw for the index error we will discover a new small side error: at the end of the operations we have to repeat the series : check up and adjusting of the side and index errors.
sextant altitude – instrument error – index error = observed altitude
Altitude measured with a sextant : corrections to apply
Dip - Refraction - Semi-Diameter
Dip
The error is due to the height of the eye above the Sea.
dip = 1,7725’ √ ht ht = height of eye (in meters)
Dip should be subtracted from the observed altitude to get the apparent altitude
observed altitude – dip = apparent altitude
Refraction
It is due to the passage of the optical beam through the layers of air with different density that are above the earth's surface.
refraction = 60,4” cot h h = apparent altitude at a temperature of 10° C and pressure of 1010mb
a small multiplying factor to be applied to the refraction with different temperature and pressure :
(pressure in mb/1010) ∙ 283/(temperature C° + 273)
Refraction should be subtracted from the apparent altitude to get the True Altitude
Semi-Diameter
It is the last correction (only for the Sun). The lower limb of the sun is used for solar observations, therefore the semi-diameter must be added to the altitude measured.
S.D. = ( 1/sin1’ ) ∙ ( r / d ) r = Sun radius d = distance from the Earth to the Sun
apparent altitude – refraction – semi-diameter (only for Sun) = true Altitude
examples of calculations using a sextant with the following errors:
index error = 2,0’ (correction = -2.0’)
correction for instrument error = -1,2’ (from a calibration certificate for altitude between 35° and 50°)
height of the Eye above the Sea = 2,5 meters
sextant altitudes : Sun 35° 25,9’ (lower limb) – star 48° 28,8’
| Sun | Star | |
| 35° 29,5' | sextant altitude | 48° 28,8' |
| - 2,0 | index error | - 2,0 |
| -1,2 | instrument error | - 1,2 |
| 35° 26,3' | observed altitude | 48° 25,6' |
| - 2,8 | dip | - 2,8 |
| 35° 23.5' | apparent altitude | 48° 22,8' |
| - 1,2 | refraction | - 0,9 |
| 35° 22,3' | true altitude | 48° 21,9 |
| + 15,7 | semi-diameter | |
| 35° 38,0 | true altitude | 48° 21,9' |
Tips & tricks: concentration about the technique of sights
Sun sights: two sights are taken usually. The first one a couple of hours before the Sun crosses our meridian (meridian passage), the second one is made at the meridian passage (azimuth 180° or 0°). The goal is to ensure that the azimuth difference (between two sights) is at least 40°.
Stars sights (at least 5 stars) Both in the morning twilight and in the evening twilight: with stars of same magnitude sights always start Eastward and end Westward.
| altitude correction tables download |
from " La navigazione astronomica " free book in pdf by Capt. Roberto Iori
© nauticalalmanac 2024 - all rights reserved